Yew Boxes
Bob Chapman uses yew to turn three different box designs
There is a yew (Taxus baccata) tree growing in the churchyard at Fortingall in Perthshire that is thought to be between 2,000 and 5,000 years old and which is possibly the oldest living thing in Europe. Yew trees have long been associated with ancient religions and there are several examples of churchyard yews estimated at around 2,000 years old. From the age of these trees it is clear that they existed long before the churches were built, indeed some of them predate Christianity itself. One theory is that churches were built near yew trees to help encourage converts from the old to the new religion.
St Helen’s church in the Derbyshire town of Darley Dale is home to another ancient yew, which illustrates the point. Estimated at 2,000 years old and growing only a few feet from the church door, there is archaeological evidence of several more ancient settlements in the area around the tree. The small Cotswold town of Stow-on-the-Wold was founded in the 11th century and the 11th-century parish church of St Edward’s boasts not one but two yew trees, made remarkable in this instance by their position rather than their age. They stand like sentinels watching over the church door but their buttressed roots must one day endanger the building and presumably they will then have to be removed. Until then they make a sight to behold – Christianity comes to middle-earth. The church of St Oswald’s in Grasmere, in the heart of the English Lake District, has no less than eight yews. Not ancient giants these, nor planted in unusual positions. The eight, all relative youngsters as yews go, have the distinction of being planted by William Wordsworth in 1819, in an attempt to improve the church’s surroundings.
Probably the best known use of yew was in the production of longbows, which were traditionally made from staves selected to contain both heartwood and sapwood along the length of the bow. The heartwood was positioned on the inside and the sapwood on the outside of the bow. The heartwood resists compression and the sapwood is strong in tension. These properties make a yew bow difficult to pull but swift to spring back, sending the arrow fast and far. The longbow was, and still is, a very powerful weapon and it was largely the skill of English bowmen that contributed to our success in battles such as Crecy and Agincourt. For bow-making all the natural defects that are common in yew must be avoided and only very straight grained timber is suitable. As a result the manufacture of longbow staves is very wasteful and the demand for medieval bows led to a serious decline in the number of mature yew trees. They were depleted all over Europe and this was partly responsible for the change from longbows to muskets as weapons of war, which occurred between about 1545 and 1595. Churchyards seem to have been exempted from the search for ‘weapons-grade’ yew trees.
Yew is one of the most beautiful of our native English woods. The heartwood varies from pale orange-brown to mid-brown, sometimes stained red or purple by iron, and the sapwood is a pale creamy white, often accompanied by shades of grey at the boundary with the heartwood. Both heartwood and sapwood work easily, sand well and take a high polish. Used for furniture and decorative woodware, it is an excellent wood for turning.
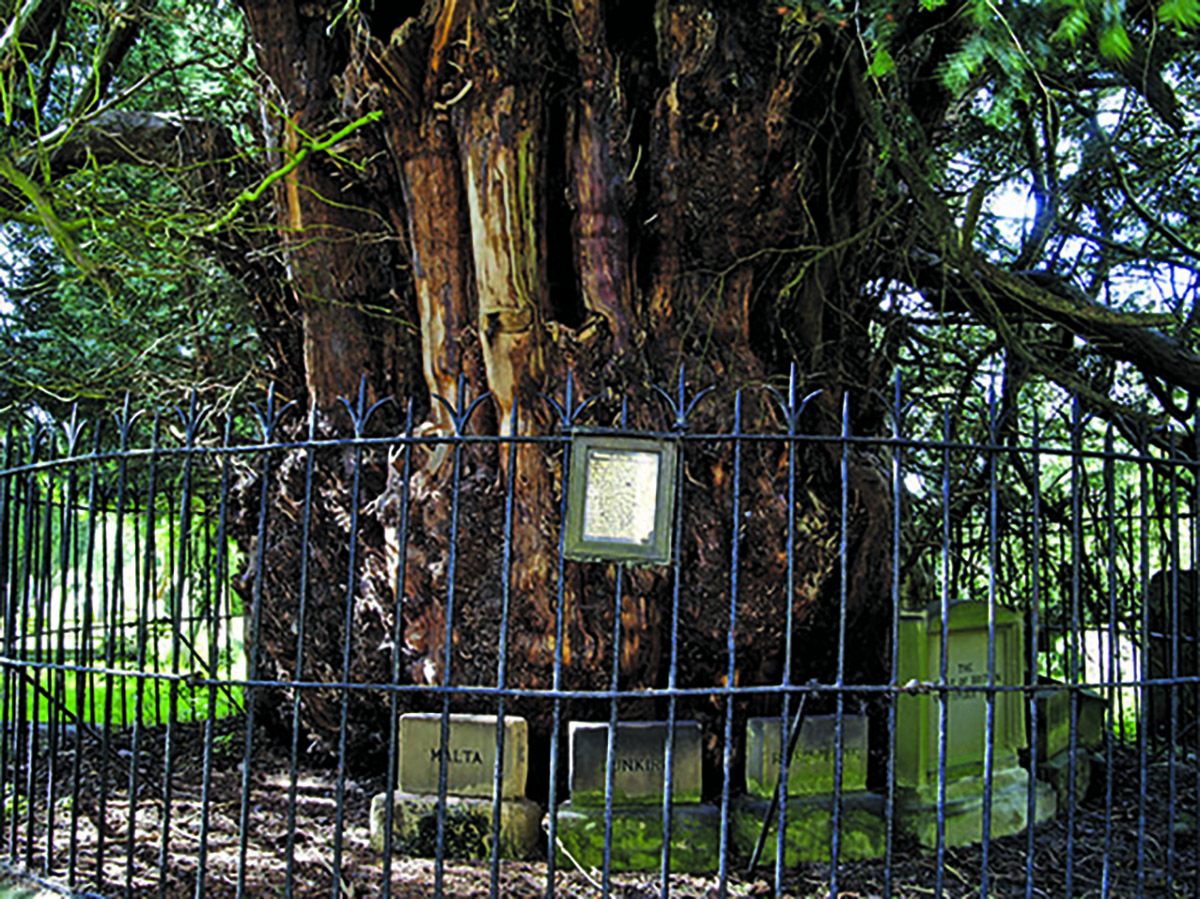
This yew tree in Darley Dale is estimated to be around 2,000 years old
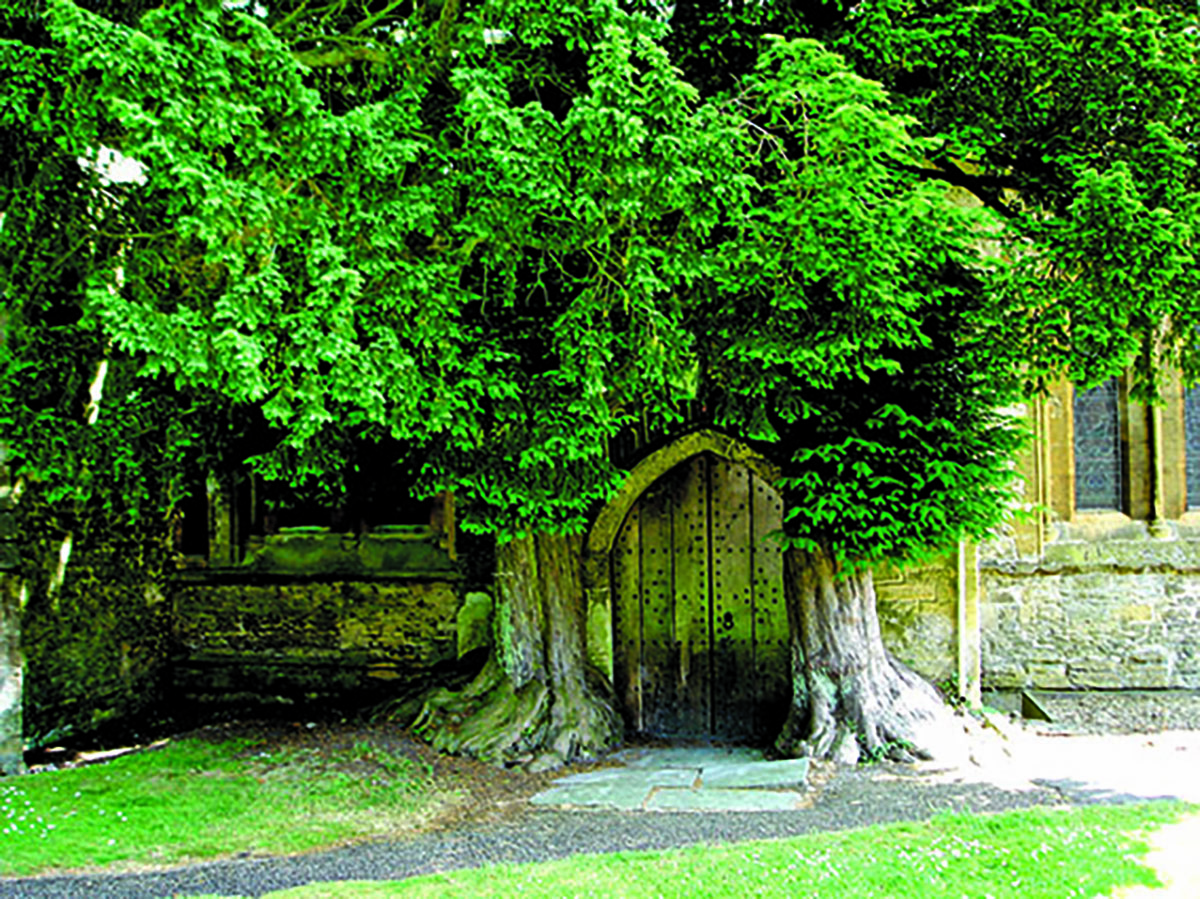
These two yew trees surround the door of St Edward’s church, Stow-on-the-Wold
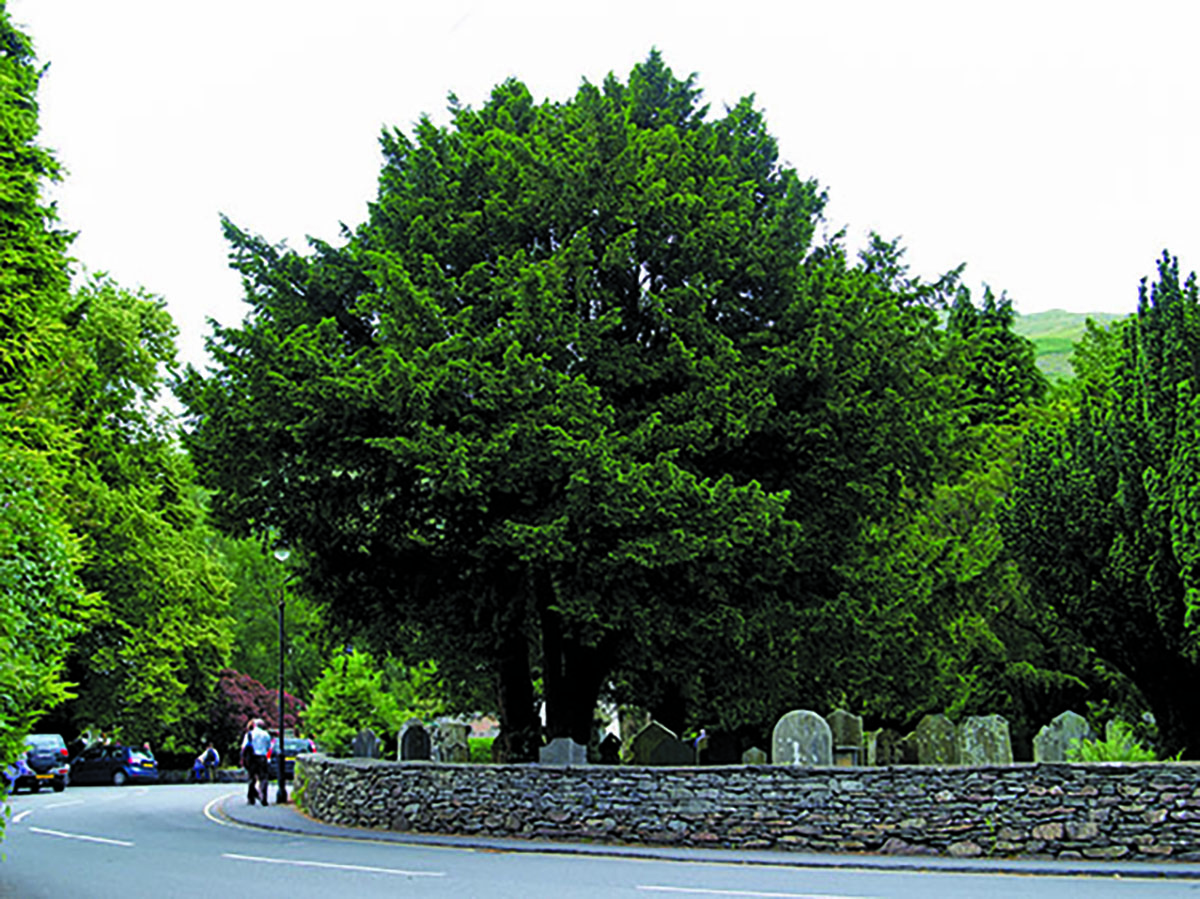
William Wordsworth planted these yew trees at St Oswald’s church in Grasmere
Making yew boxes
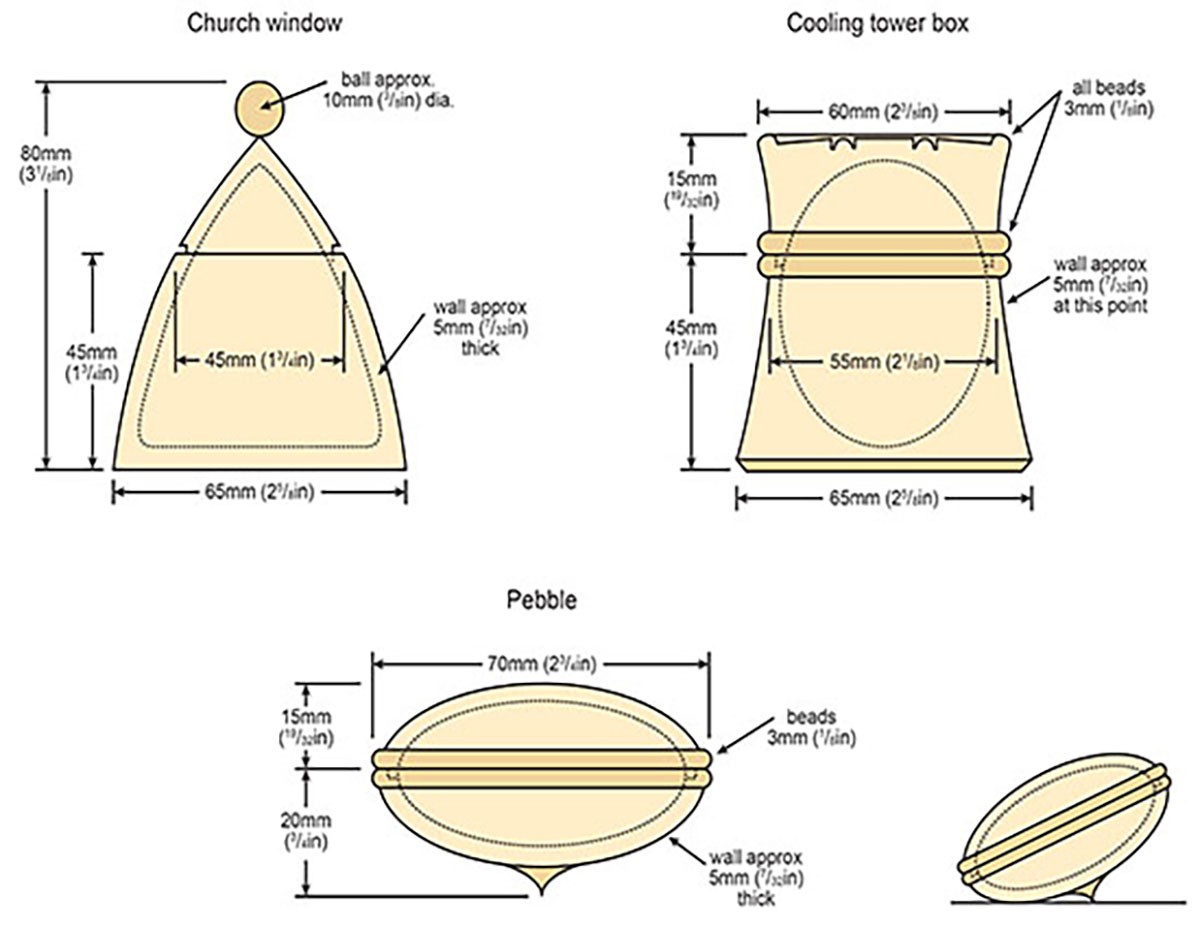
When sketching shapes for boxes decide whether or not sapwood will be included. The ‘pebble’ design is so simple that the sapwood contrast is likely to increase the visual attraction of the box, whereas the other designs are more formal and a patch of sapwood would dominate the piece, leading the eye away from the primary design features of shape or texture
Plans & Equipment
 Equipment Used Parting tool Bowl gouge Spindle gouge Superglue Small scraper 240–400 grit abrasive papers Sanding sealer Skew chisel Rotary tool with square-ended cutter Wire brush or abrasive discs 3mm bead forming tool
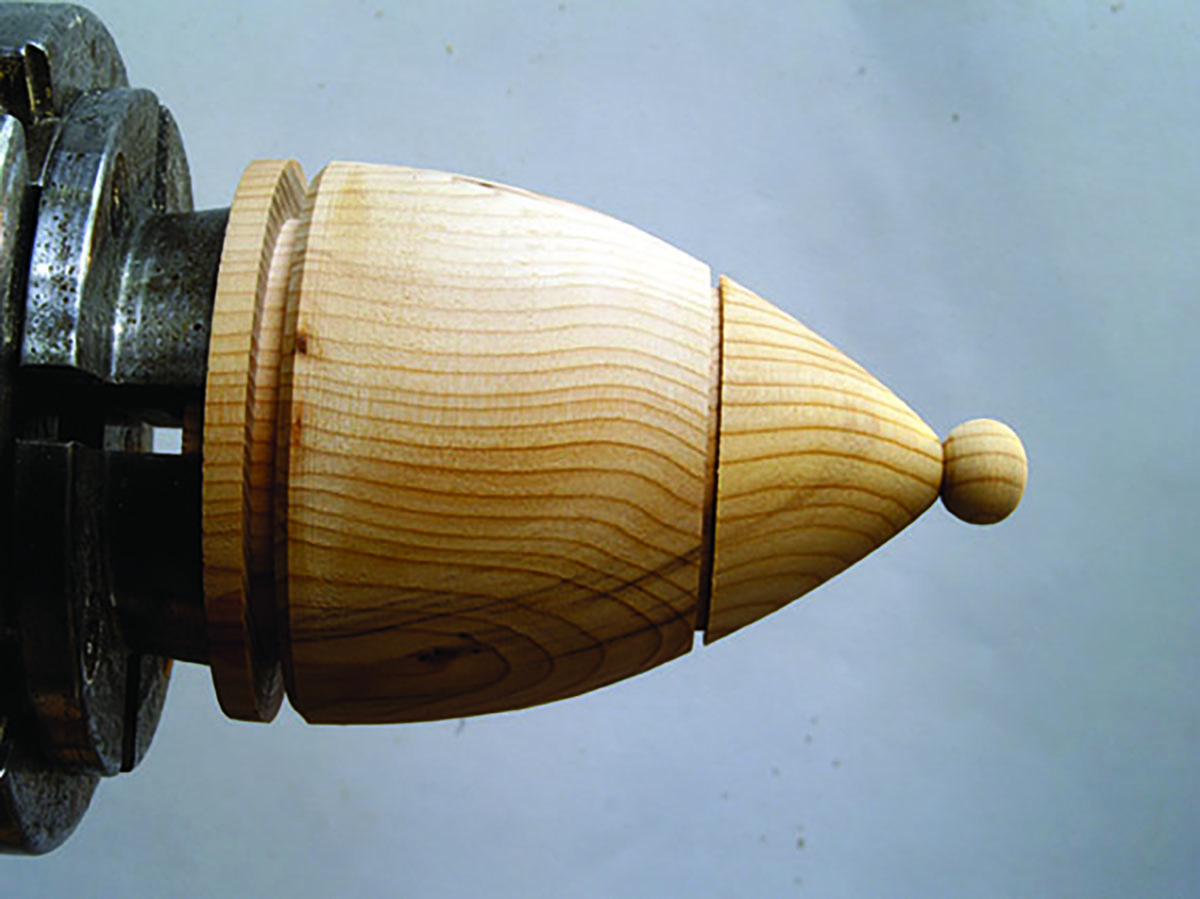
The ‘church window’ box
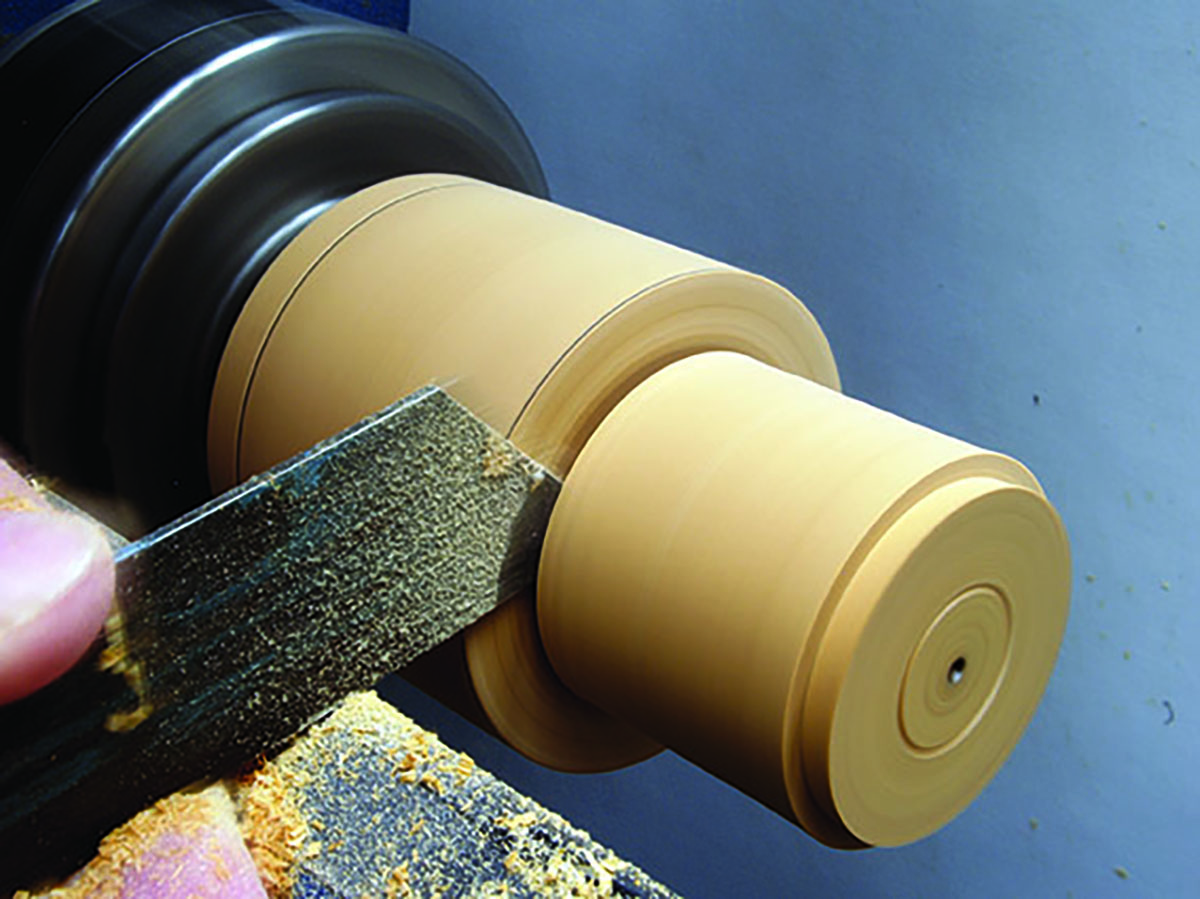
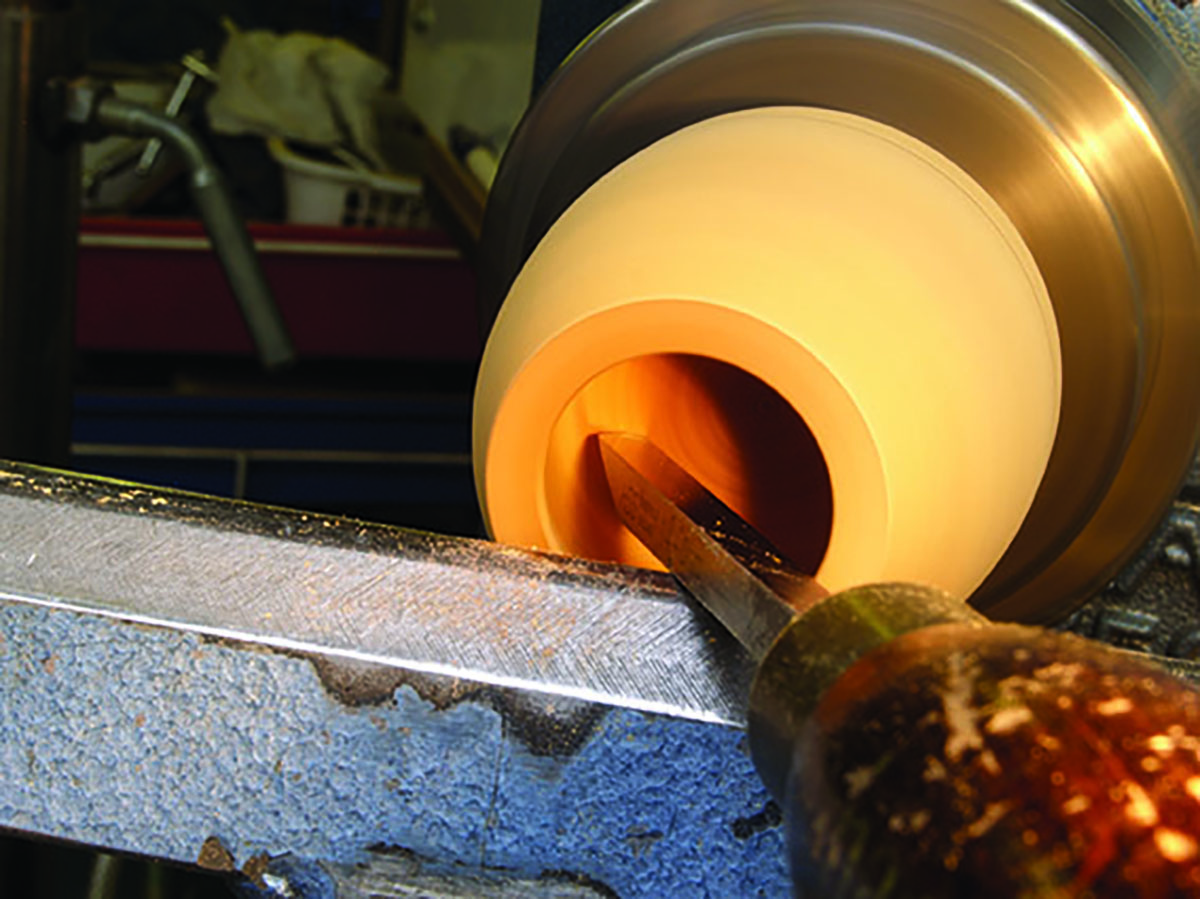
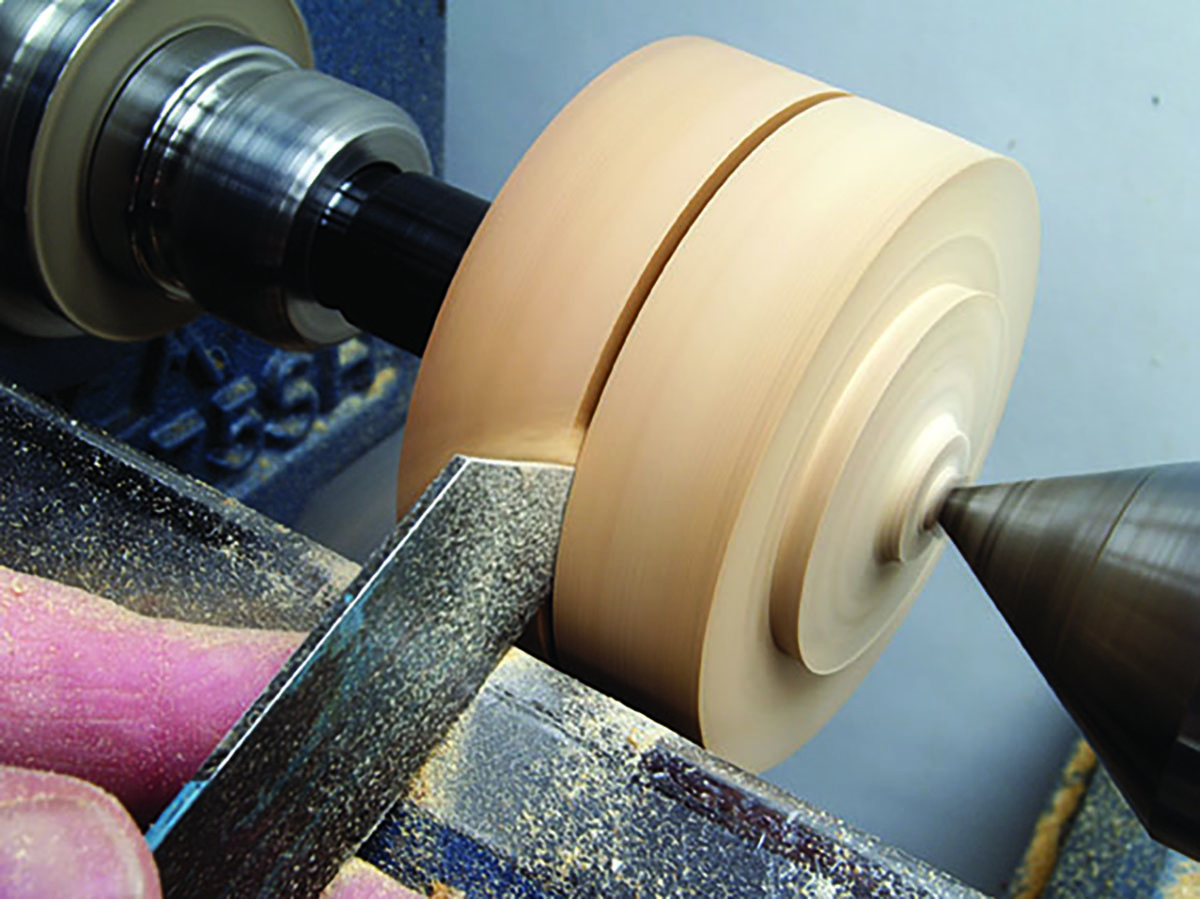
1. Using the planned dimensions as a guide, turn a suitably sized piece spindle grain orientated of yew down to 65mm between centres, and form dovetails on each end. Mark out a section at about 45mm for the box bottom and take the remainder down to a diameter a little more than 45mm, then part off. This section will be used for the lid
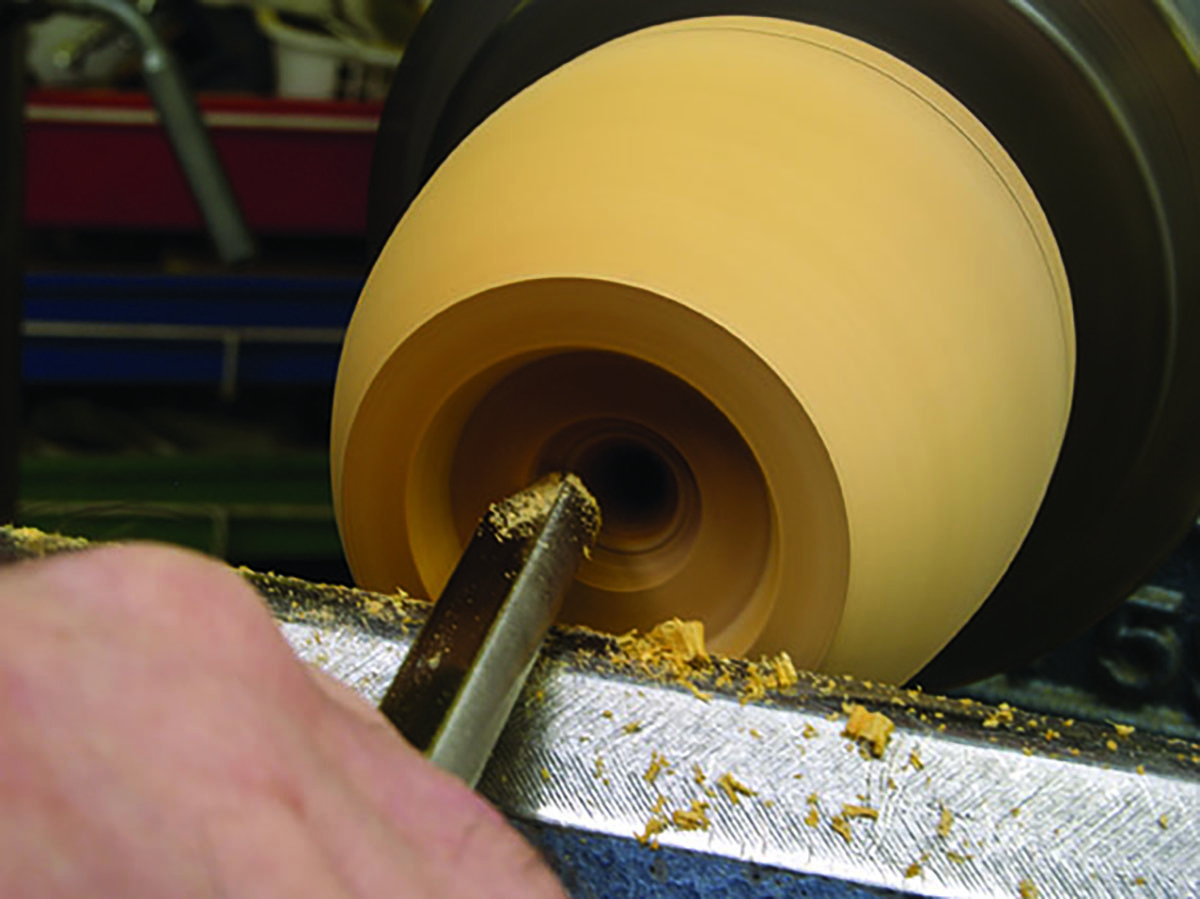
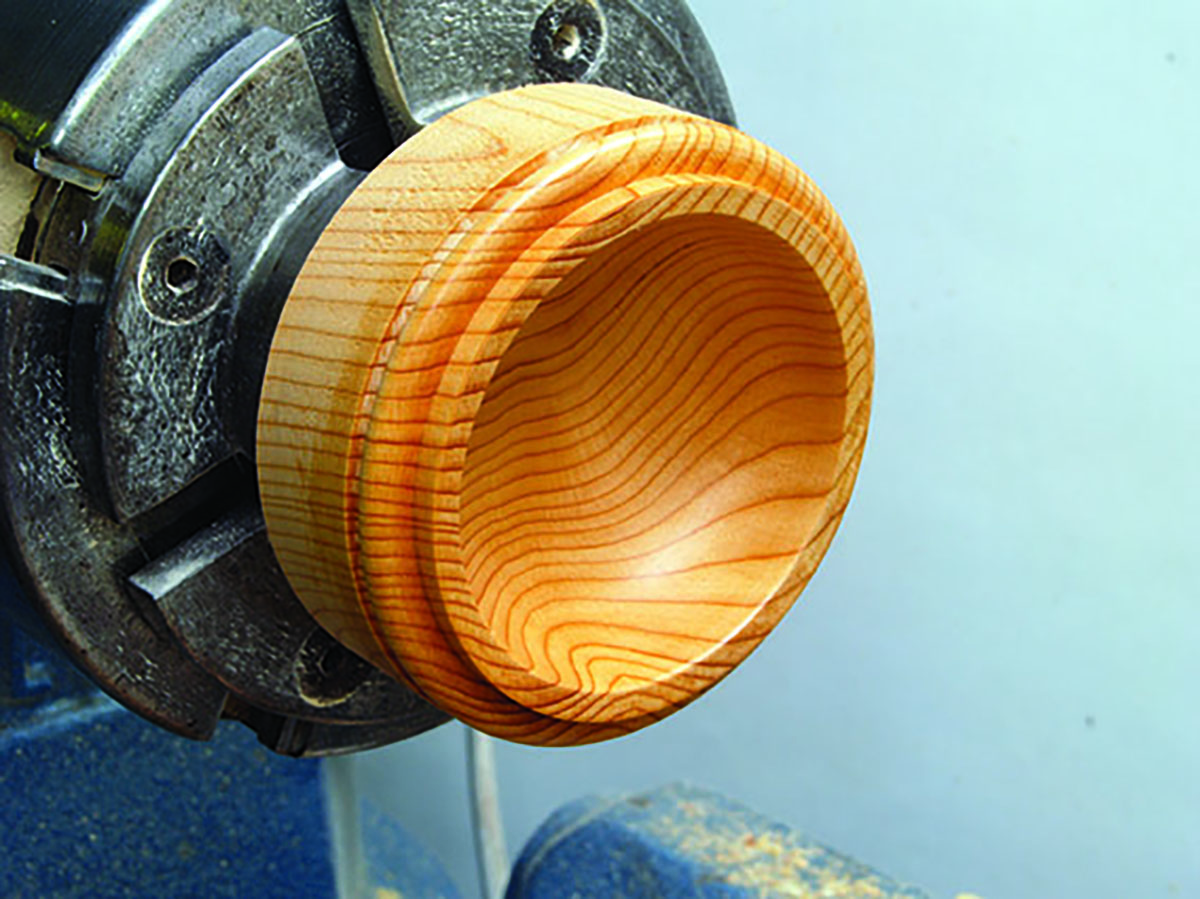
2. Use a bowl gouge to reduce the outside of the blank to the approximate shape required, maintaining the small diameter at just over 45mm. The inside is rough hollowed using a spindle gouge with its flute at about 10 o’clock, pulling it from the centre out towards the edge
3. Yew is prone to small cracks and shakes but you can fill them with superglue. Use thin glue and give it time to penetrate the crack by capillary action. Allow time for the glue to set
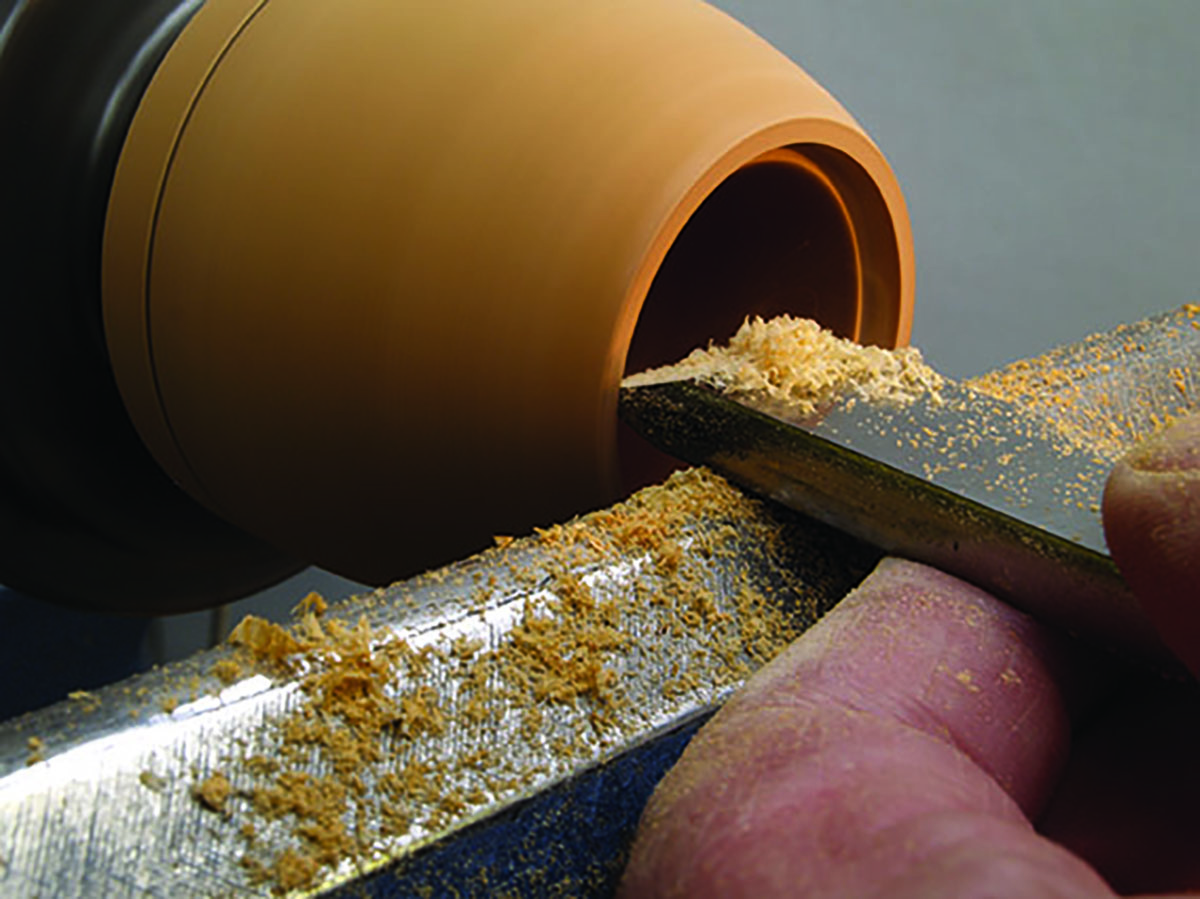
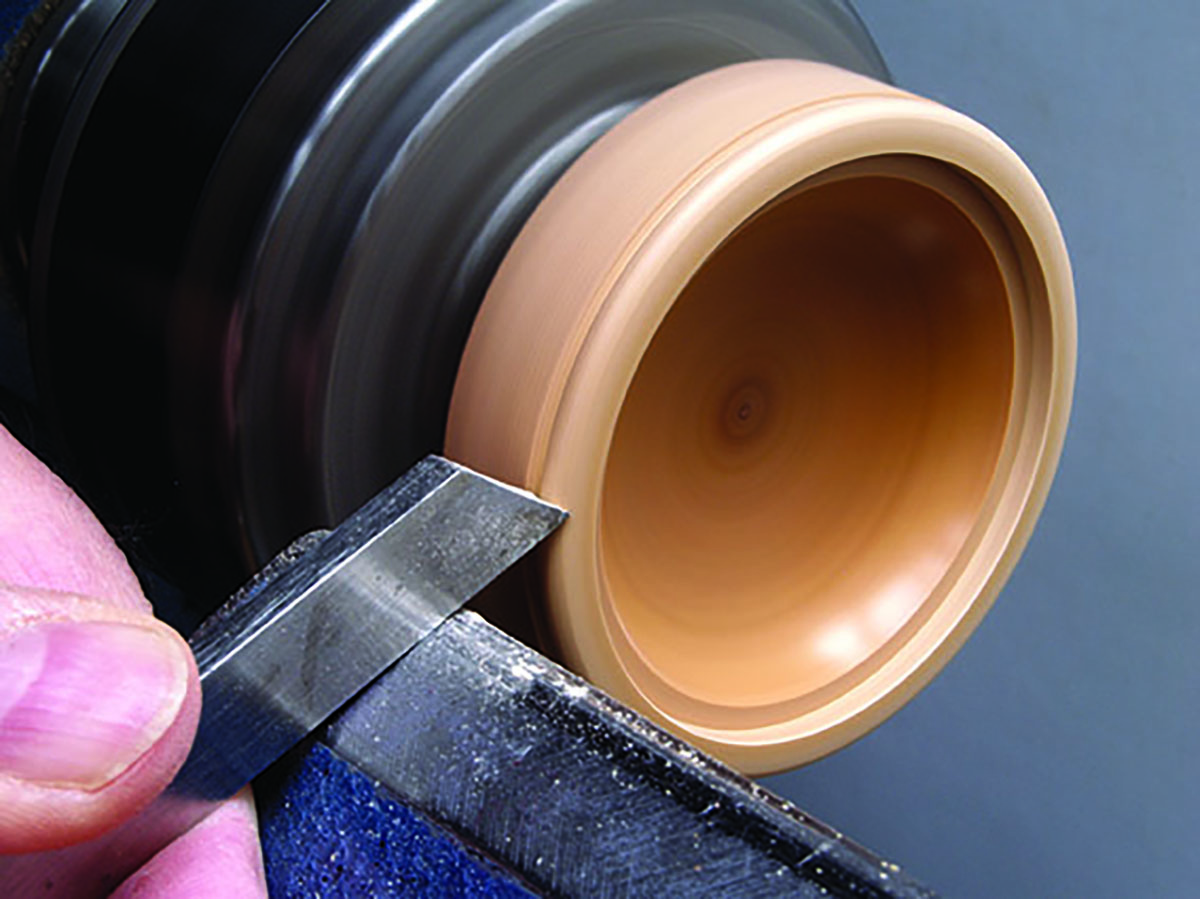
4. Use a small scraper to complete the shaping and refine the inside surface. The scraper has the burr honed away and is used horizontally with the cutting edge at centre height or very slightly below. Take light cuts from the centre outwards and up the sides to the top. The curvature of the internal corners matches the shape of the scraper
5. Sand lightly with 240 and 400 grit papers before sealing with sanding sealer. Next, use a skew chisel to cut the shallow recess to accept the box lid
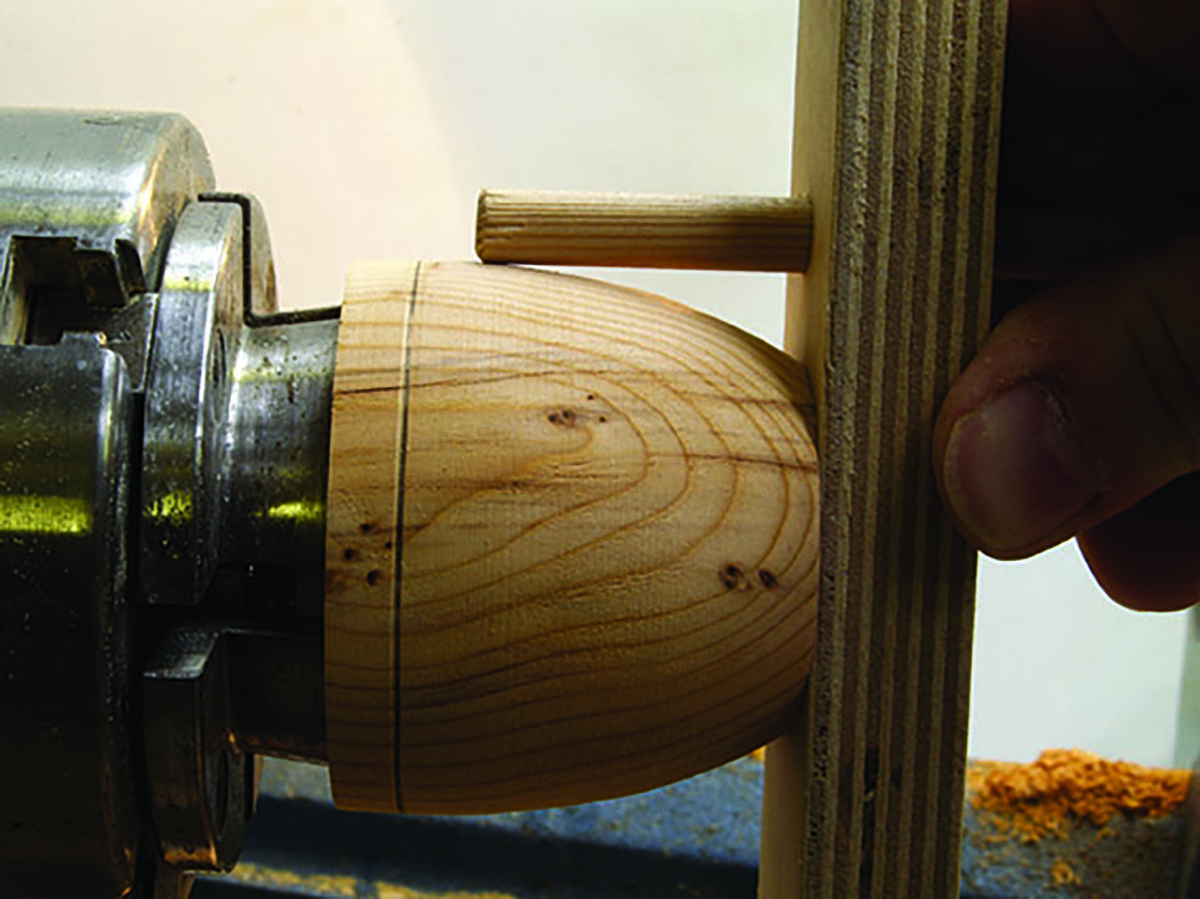
6. Mark the blank so that it can be replaced in the same position, remove it from the chuck and replace it with the lid section. Carefully turn down a short spigot to be a tight fit in the box. This requires a lot of ‘trial and error’. Be patient!
7. Fit the box onto the lid. If the fit is good, the box will stay in place when the lathe is switched on but if in doubt, bring up the tailstock centre for extra support. With a small bowl gouge shape the lid to match the curvature of the box. Continue until the curve flows smoothly across the joint between the pieces. Once the external shape of the lid has been established, remove the box bottom and hollow the inside of the lid using the spindle gouge and scraper as before. Sand and seal the interior of the lid, and remove it from the chuck
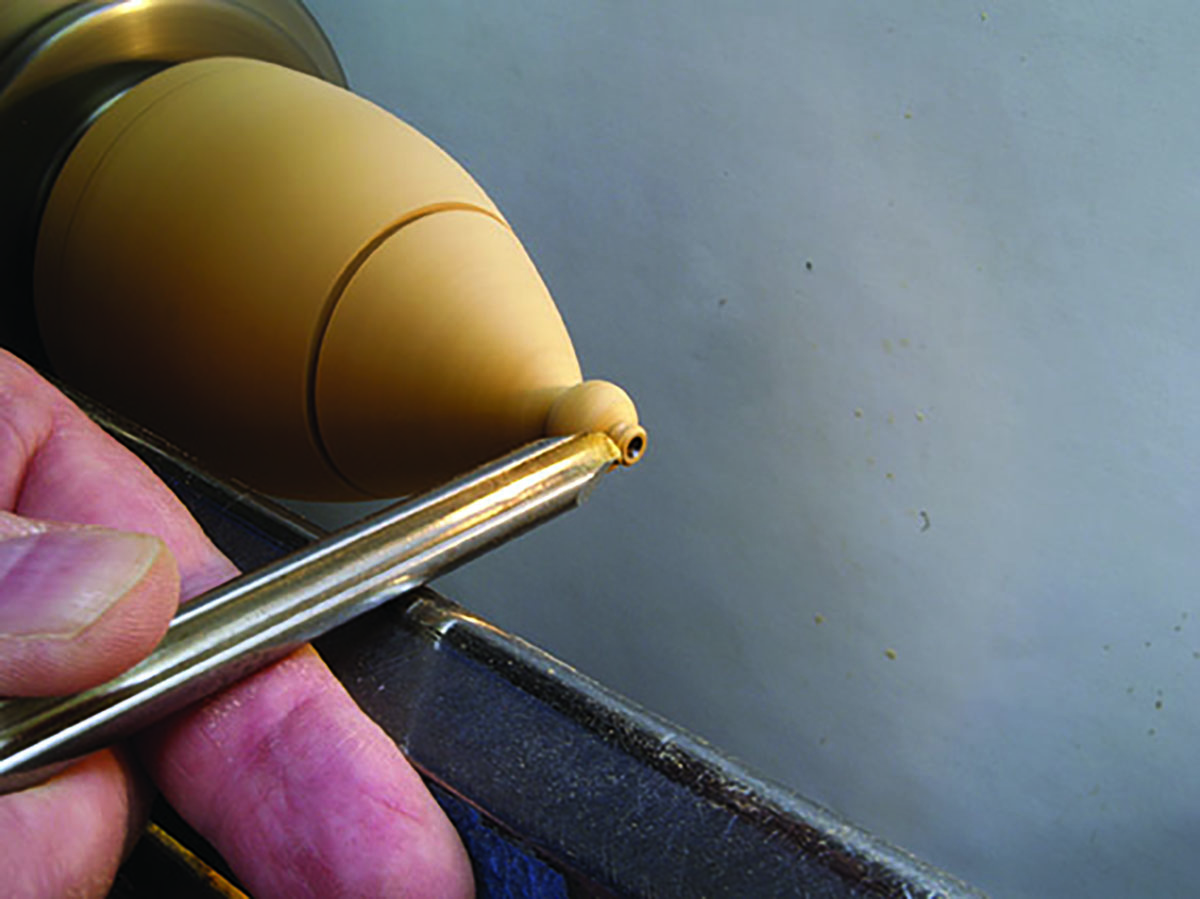
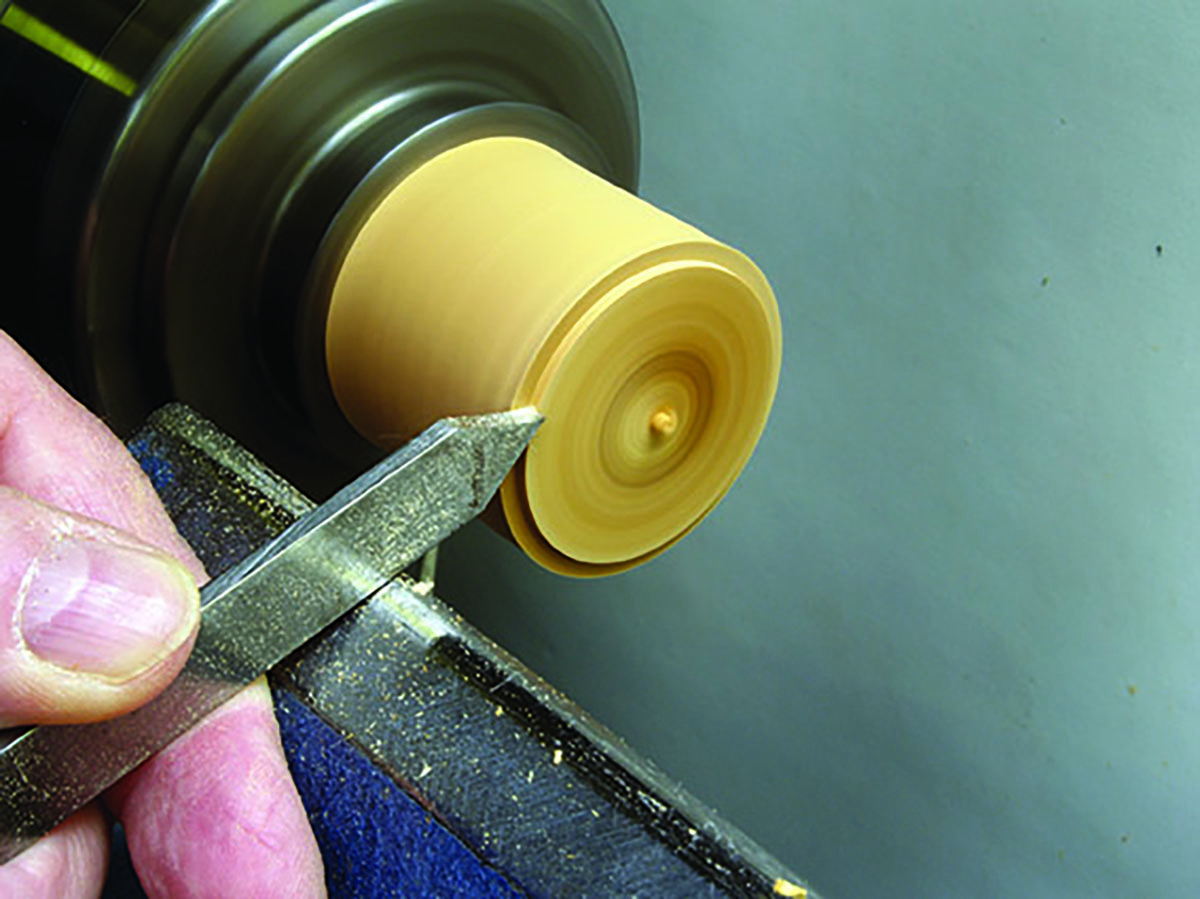
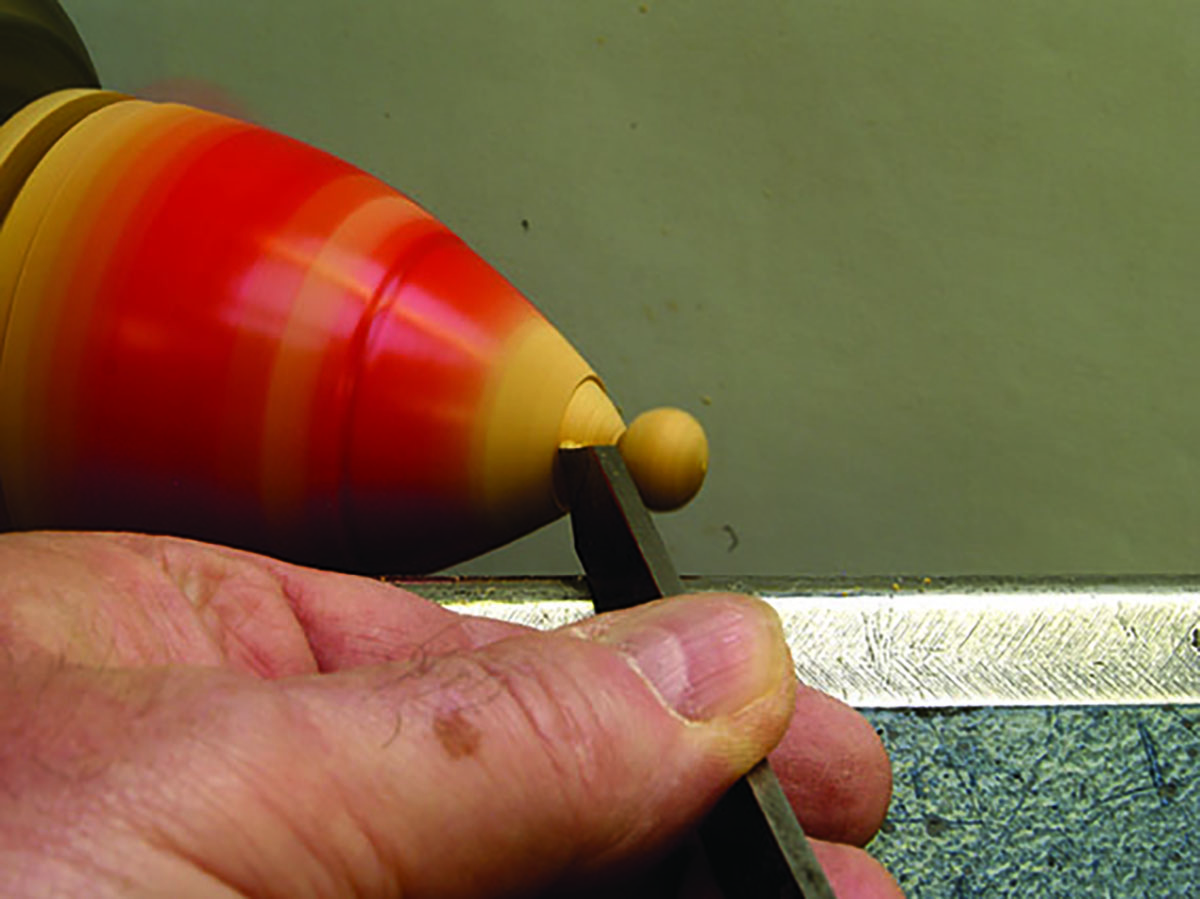
8. Replace the box body section in the chuck and refit the lid, matching the grain pattern from box to lid. No matter how good the fit, the joint between box and lid will always be visible, so make a feature of it by cutting a narrow groove on the joint line. Complete the shaping of the lid and the ball on top. If the lid slips or comes off put a piece of tissue across the box and then insert the lid. This will tighten the fit enough to allow the ball to be finished
9. With the box completed, it is now almost ready for parting off. I intend to texture the surface, but if you prefer a smooth polished surface then sand and polish before parting off
Texturing

10. It is important that the lines of the texture are vertical down the box and that they all start and end at the same level. To help with this, draw pencil lines on the box as a guide. The texturing is fairly straightforward with the corner of a square-ended cutter in a rotary tool. The texturing raises small splinters and wispy bits of ‘fuzz’ on the wood, which can be removed with a fine wire brush or abrasive ‘bristle discs’
11. Texturing always looks better with well-defined start and finish lines, and to achieve this the box is returned to the lathe in order to cut in slightly at the top and bottom of the texturing with a small parting tool. To prevent the top coming off, hold it in place with some insulating tape
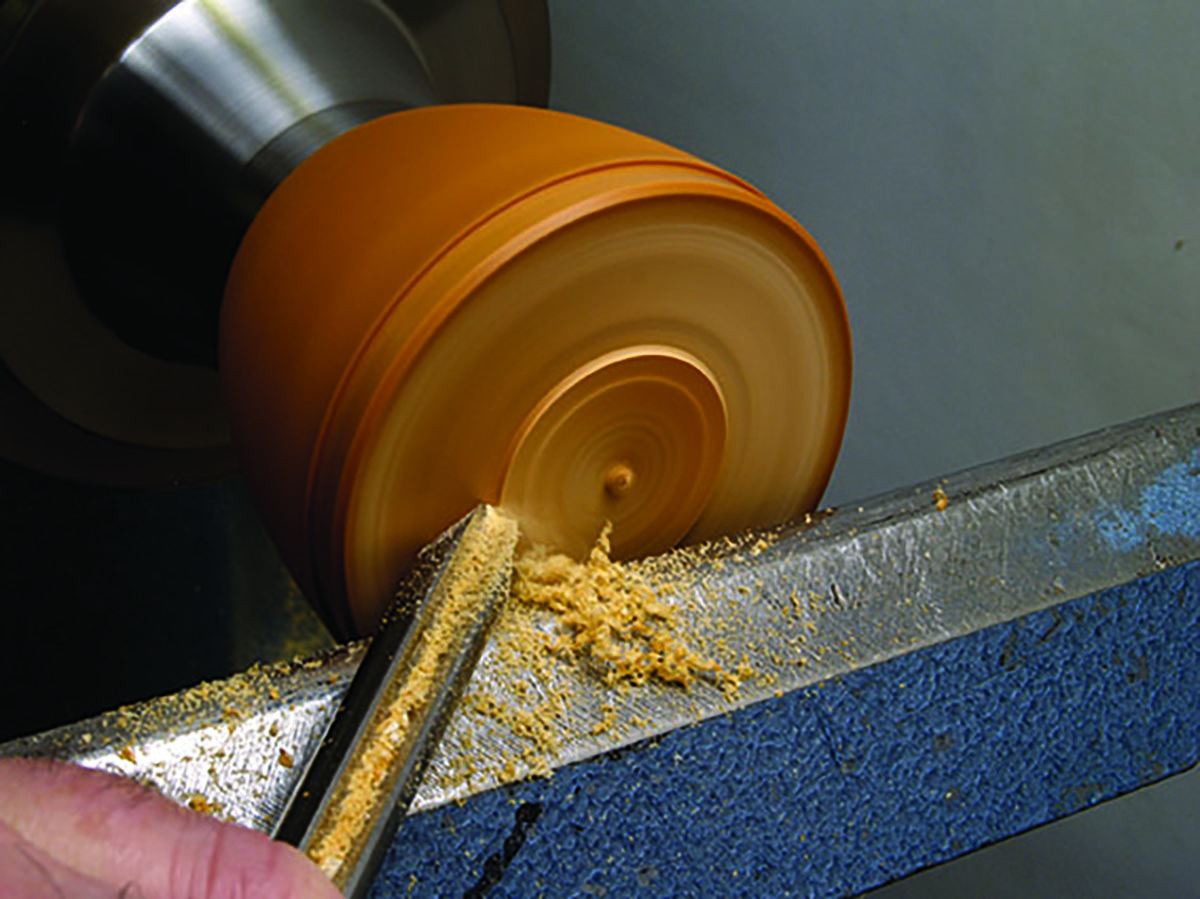
12. The box is then parted off and reversed onto long nosed jaws used in expansion mode just inside the recess for the lid. This allows you to clean up the bottom of the box, taking light cuts with a small bowl gouge
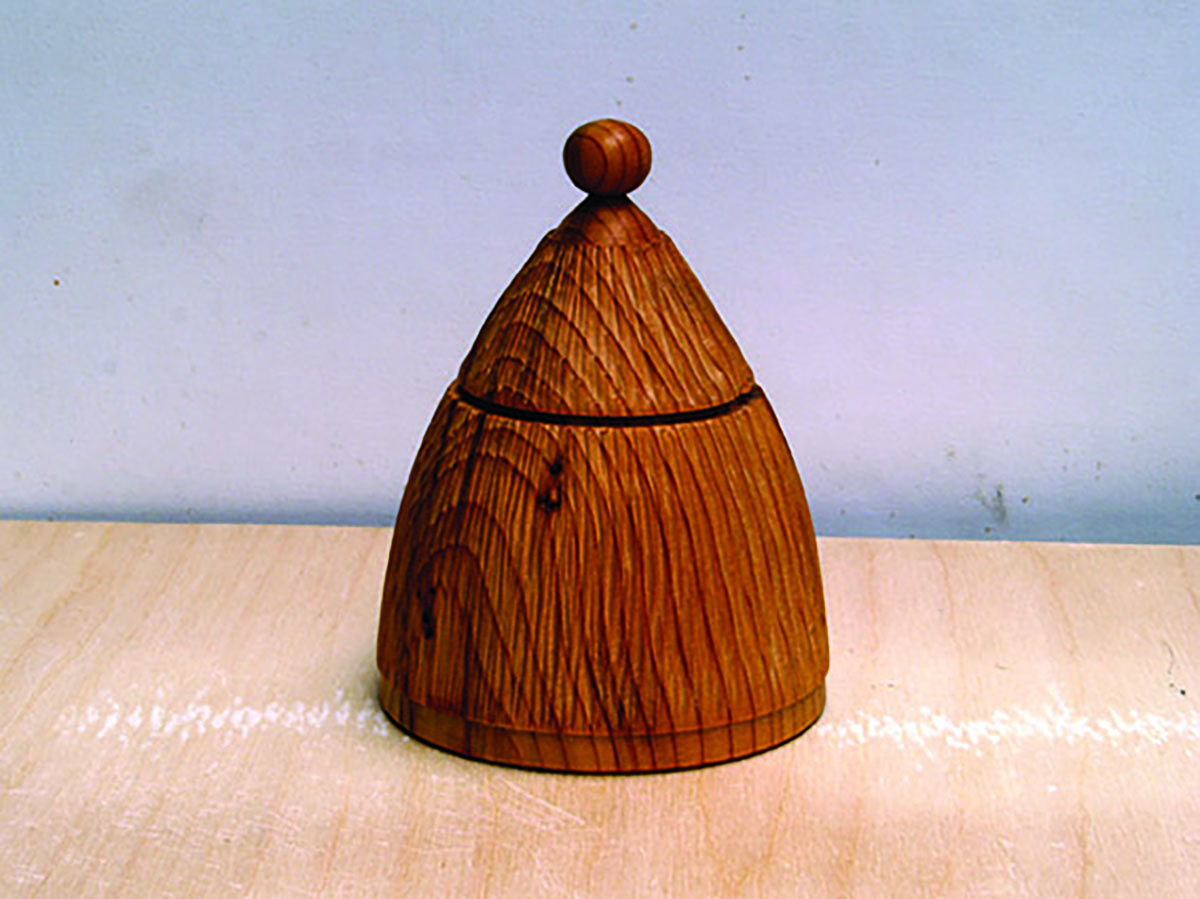
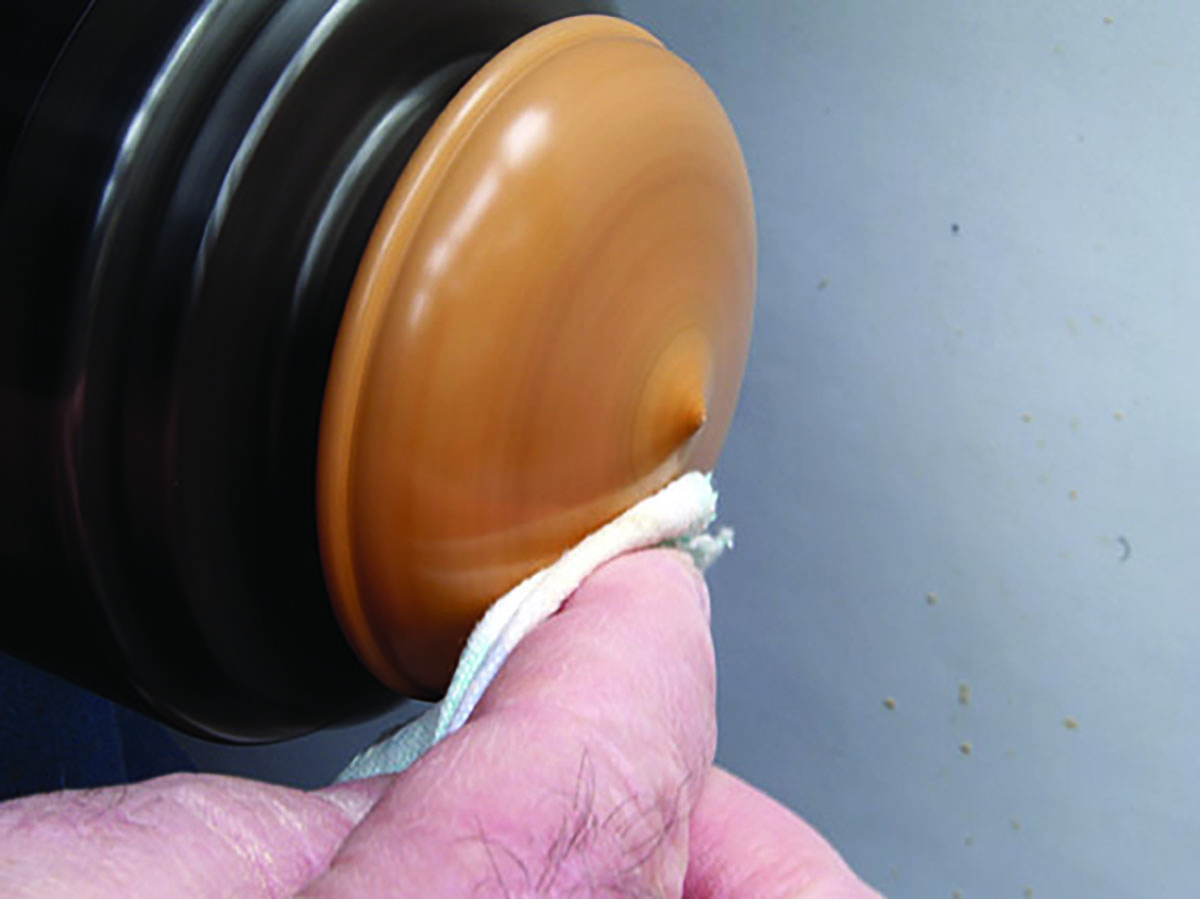
13. After buffing, the box is finished
14. For this box design, you’ll need a small piece of yew approximately 75mm diameter and 50mm thick, containing both heartwood and sapwood, with the grain running from side to side rather like a small bowl blank. Mount it between centres, then true up the blank and form a shallow 5mm dovetail spigot on each side. Then, using a narrow parting tool, divide the blank into two slightly unequal parts approximately 16 and 19mm thick

15. The thicker part is the box base. Holding it by the spigot, hollow it out with a gouge, refine with a scraper, then sand and seal and cut a recess to receive the lid. Take care to allow enough wall thickness for the beads, which mark the joint between lid and box
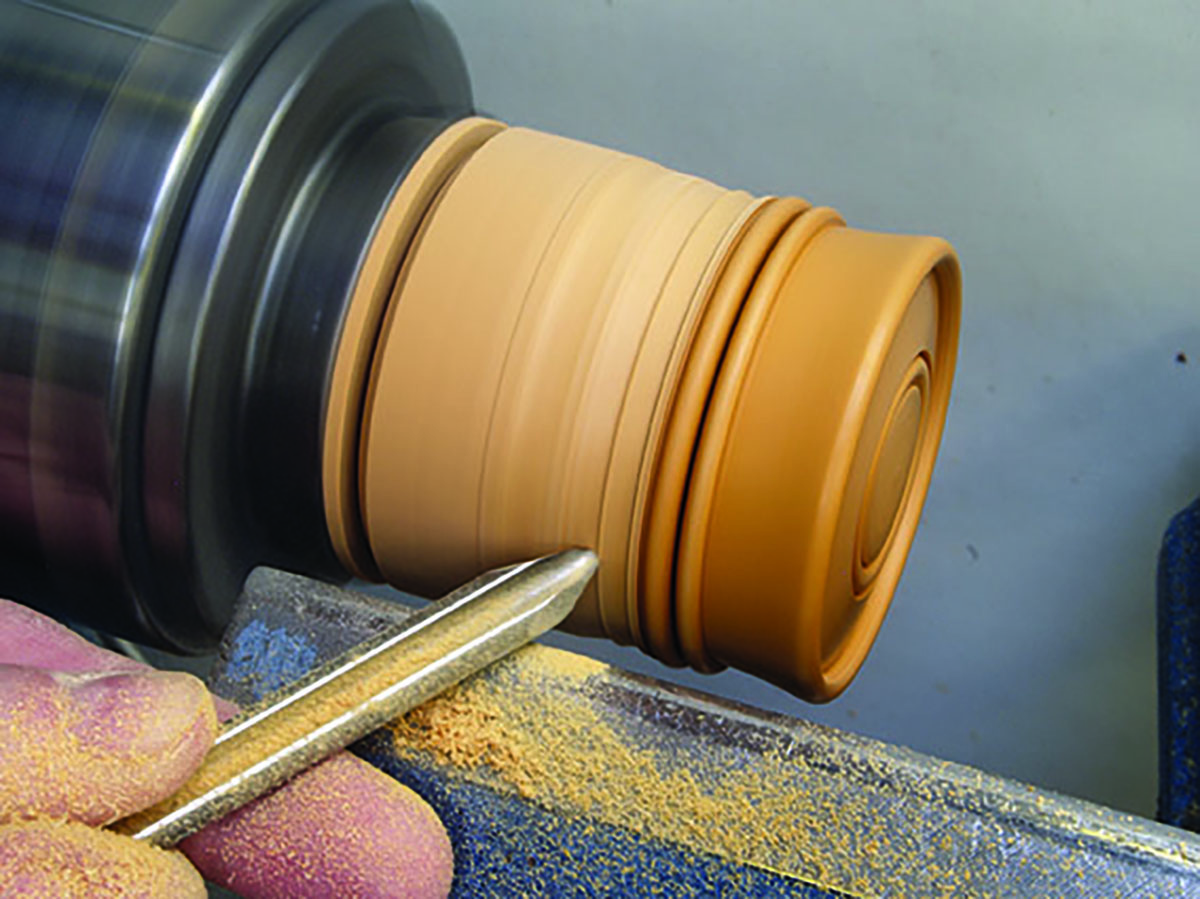
16. Use a 3mm bead forming tool to make a bead right on the very edge of the box, blending the curve of the bead into the flat area where the top and bottom will meet
17. Reverse the work and hold it by expanding the chuck jaws into the recess that was formed for the lid. Using a small gouge, complete the underside, forming a small point which will tip the box sideways. This finishes the box bottom, which is sanded and sealed ready for buffing later
18. The box lid is made in a similar way, taking care when cutting the spigot to fit the box bottom. The lid is hollowed as before and can be reversed in the jaws and gripped gently by the spigot, using tape to protect it if necessary, while the upper surface is completed. The two parts are then combined into the finished box The ‘cooling tower’ box

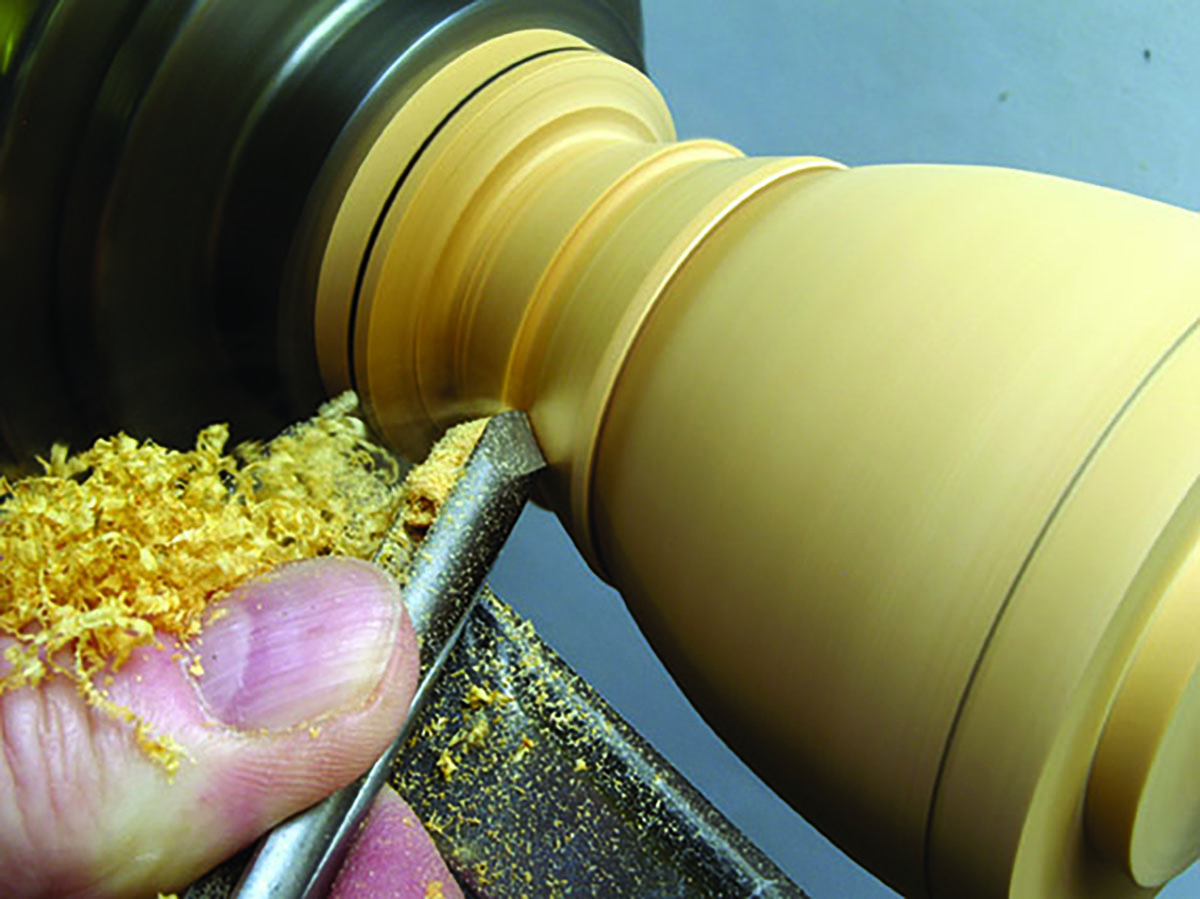
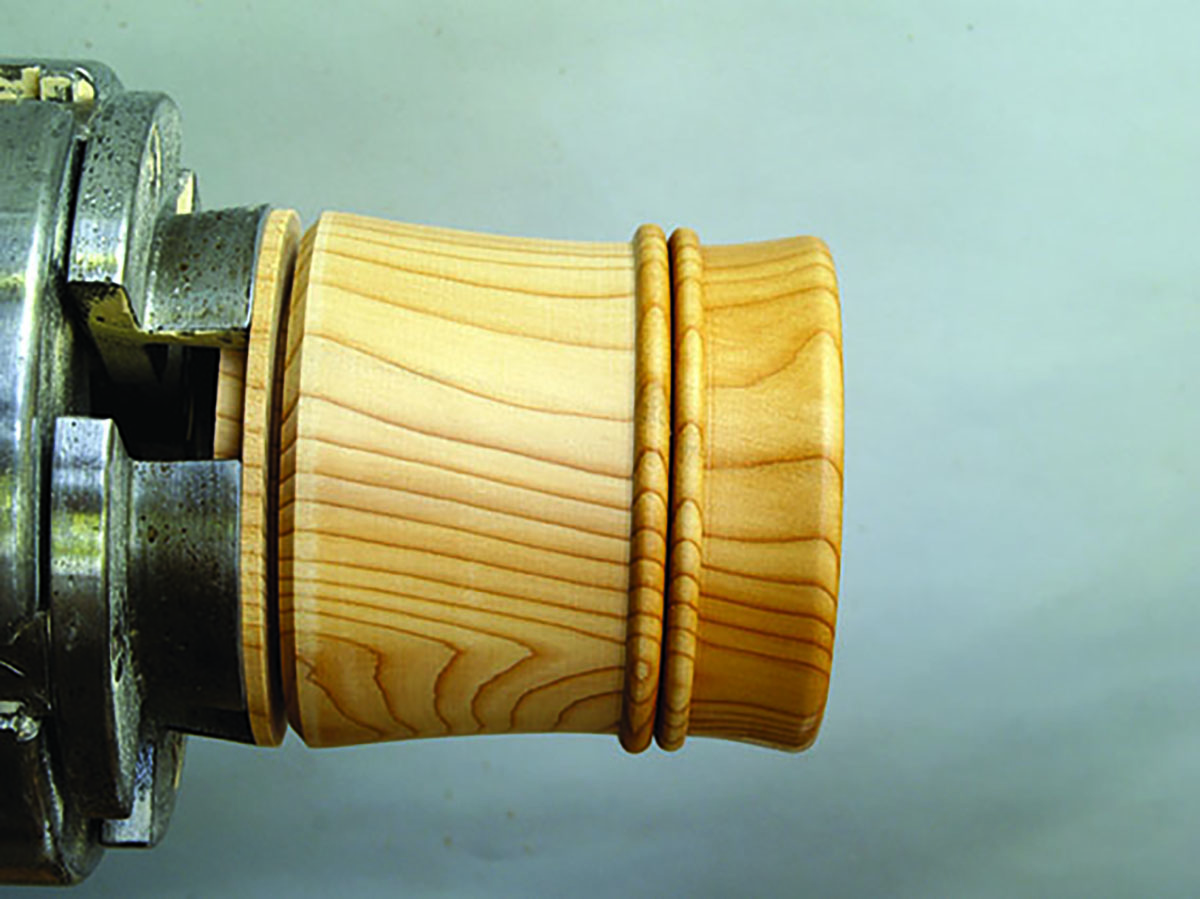
19. Driving past power stations I’ve always been struck by the elegant shape of the cooling towers, and have made many boxes based on this design. The addition of beads at the joint between lid and box, and on the top of the lid, give it just the right amount of decoration. Starting with a suitably sized blank, form a cylinder of 65mm diameter and about 75mm long with a dovetail spigot on each end. Mark the division between body and lid and part the lid section off, leaving the body in the chuck. Form the bead around the top edge, hollow the box body and cut a recess to accept the lid. None of the dimensions are critical, but refer to the diagram for guidance. Note the shape of the interior of the box. A smooth curve is easier to shape than sharp corners and has the added advantage that it makes small items easier to get out of the box
20. Repeat this process for the lid, forming a spigot that is a tight fit in the box body. Replace the body and insert the lid. If the fit is tight the lid can be worked on without coming loose. If it won’t stay put, hold it directly in the chuck, gripping the spigot in the jaws and using tape to protect the spigot if necessary. Turn the top of the lid smooth and level and form the bead on the outer edge
21. With a small gouge, shape the lid top and edge down to the bottom of the beads, adding extra beads if desired. In the same way, shape the side of the box down to meet the bottom of the lower bead
22. Examine the profile and ensure that the curve of the sides is continuous from the body through the beads into the lid. Part off the box body and reverse it, holding it with the chuck jaws expanded into the lid recess. Clean up the bottom of the box with a small gouge, then sand, seal and polish and the job’s done
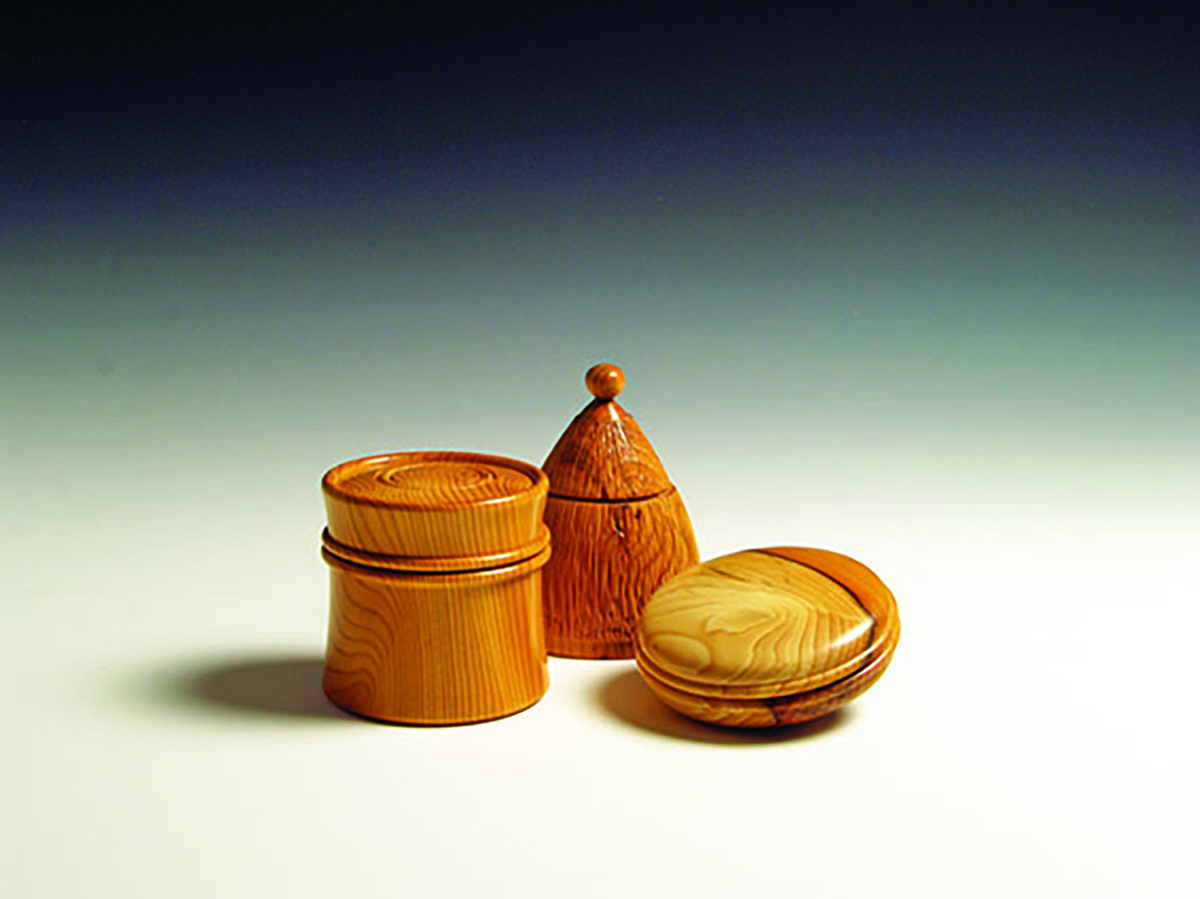
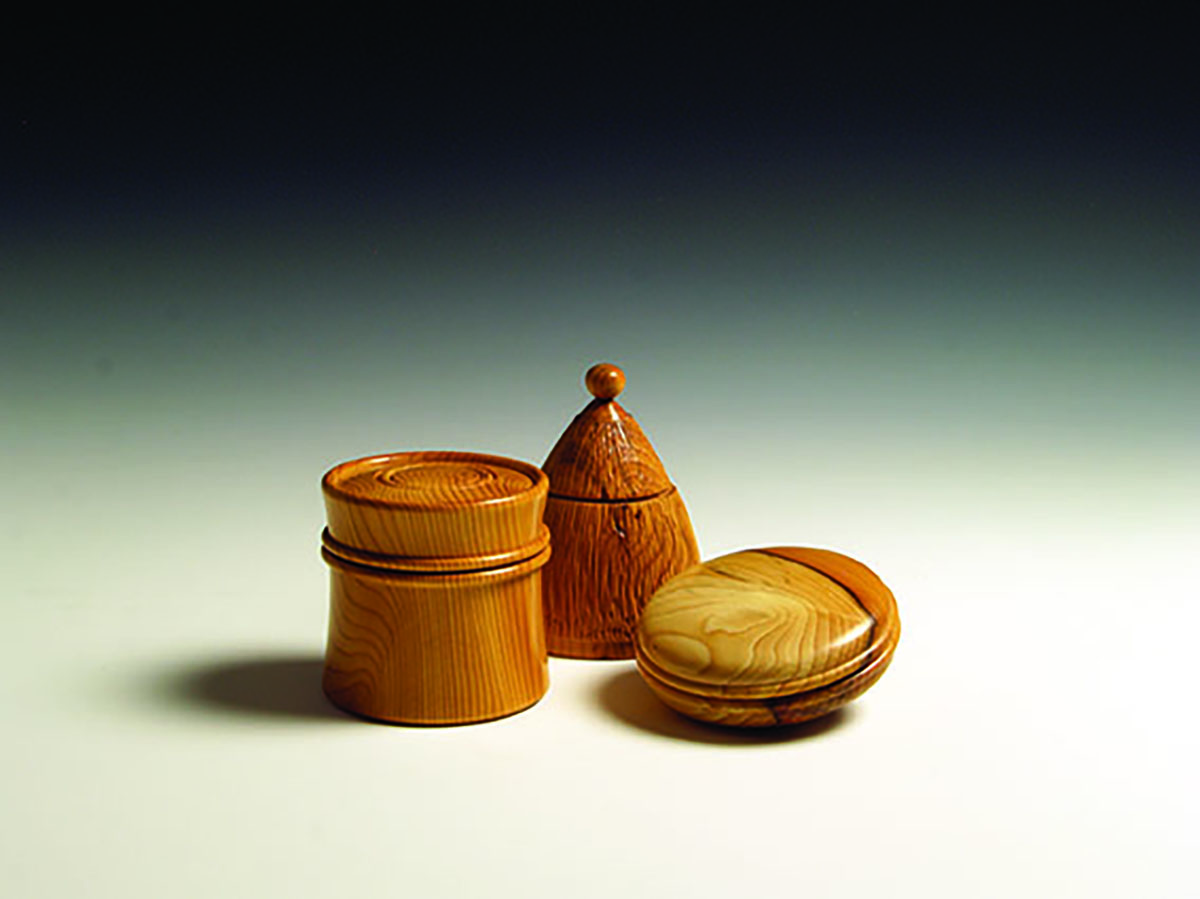
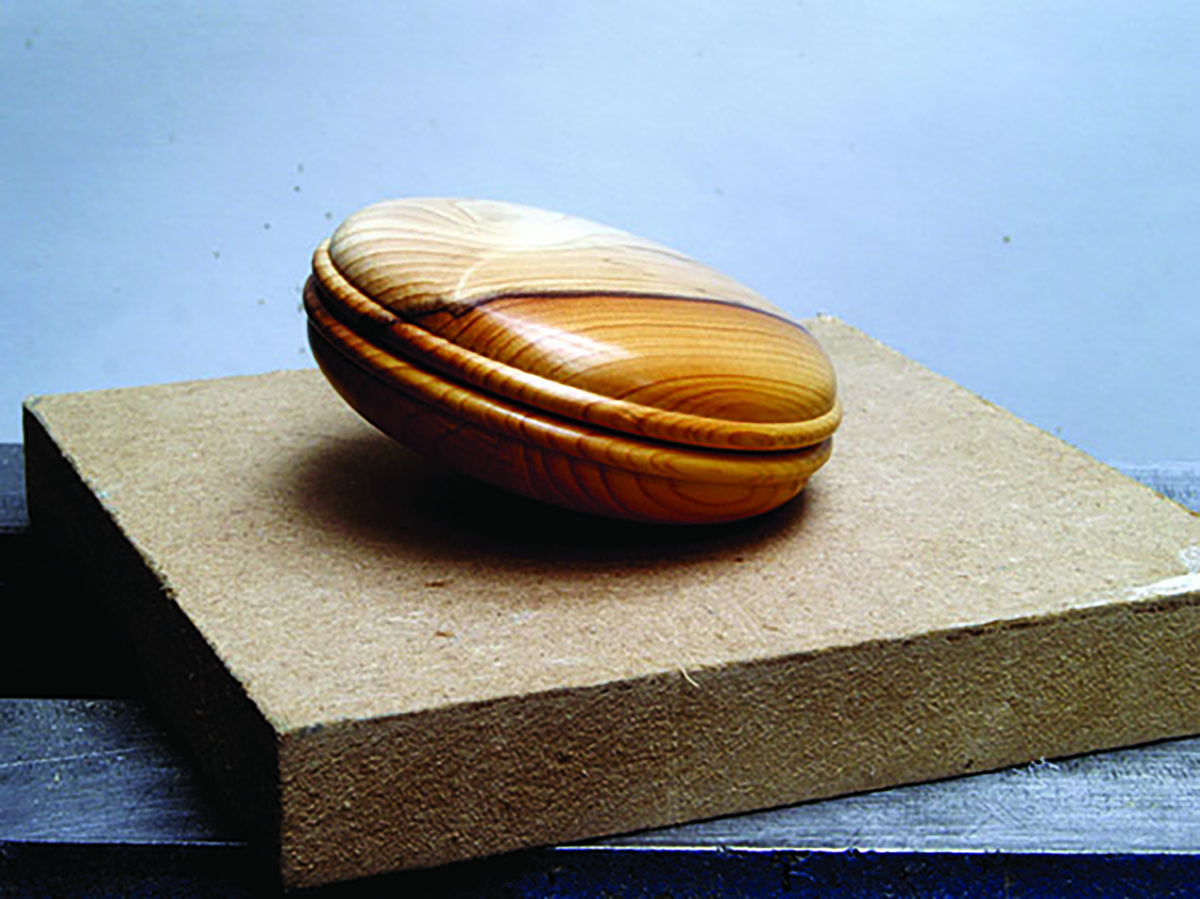
23. The set of finished boxes should look something like this


